
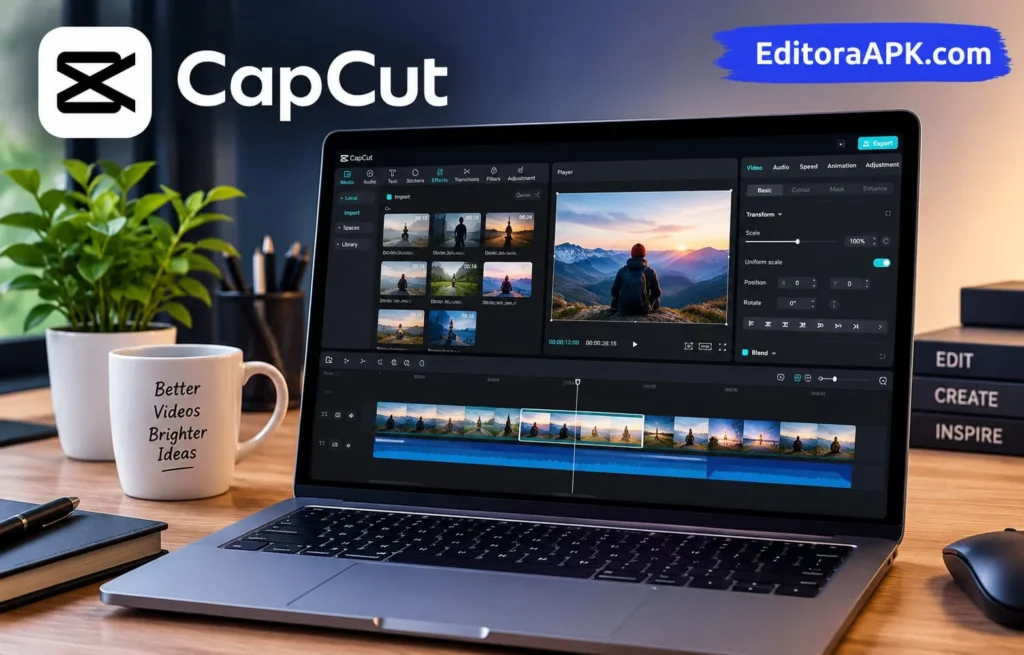
Capcut for PC: The Ultimate Video Editing Experience on Desktop
When it comes to creating eye-catching social media content, CapCut has easily become a household name. While most people first discovered its magic on their smartphones, the release of CapCut for PC has completely transformed the game for content creators, vloggers, and video editors.If you have ever felt constrained by the smaller screen of your phone or experienced frustrating lags while rendering heavy 4K files on mobile, moving to the desktop version is the absolute best upgrade you can give your workflow.
Key Features of Capcut for PC
| Features | Details |
| App Name | Capcut |
| Platform | Window & mcOS |
| File Type | EXE & DMG |
| License | Free & Pro Option |
| Offecial Website | Capcut Official Website |
What is Capcut for PC ?
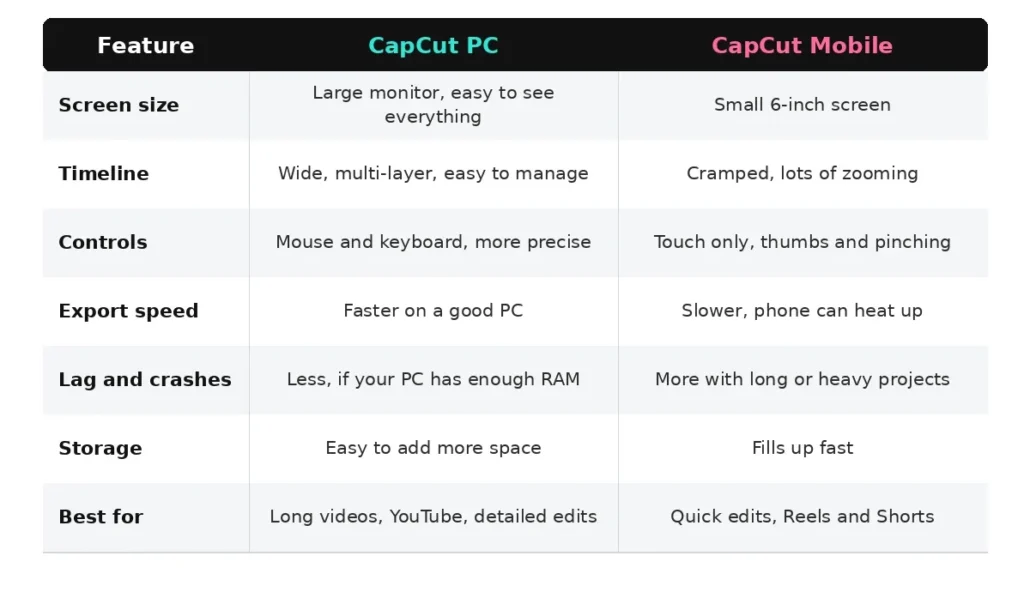
Honestly, if you have ever tried editing a decent-length video on your phone, you already know the struggle. Your phone heats up, the app crashes halfway through rendering, and your storage is constantly screaming at you.
That is pretty much why the desktop version exists. It is basically the mobile app grown up. You get all the fun stuff—like the viral effects, auto-captions, and trending templates—but running on your actual computer hardware.
Instead of pinching and zooming on a tiny 6-inch screen, you have got a massive timeline stretched out in front of you. Slapping cuts together with a mouse and keyboard just feels natural, and your PC is not going to melt when you drop a heavy 4K file into the timeline. It is fast, it is roomy, and it takes away all those annoying mobile headaches.
What Capcut for PC Offers ?
Capcut has a ton of tools, but honestly, you will only use a handful of them regularly. Here are the ones that matter.
→Timeline with multiple layers:
This is the first thing you will like on PC. Video, text, stickers, music, voiceover, each one gets its own track, and on a big screen you can actually see what is going on. Try doing the same on a phone, and it gets untidy fast.
→Auto captions:
I used to spend almost an hour on subtitles for one video. Now I click the captions, grab a cup of tea, and come back to a mostly finished job. I only fix the small mistakes, like a wrong name or a slang word it did not catch.
→Background remover:
You can cut yourself out of the background without a green screen. It works best with good lighting. In a dark room, you will see rough edges around your hair.
→Templates and effects:
Short on time? Pick a template, drop your clips in, done. Just watch for the small Pro crown on some of them, because you will not find out they are locked until you try to export.
→Text to speech:
Type something and the app reads it out in different voices. Good if you do not like the sound of your own voice. Some voices sound robotic though, so listen before you commit.
→Noise reduction and stabilizer:
Shaky video and noisy audio make a clip look cheap right away. These two tools clean up small problems pretty well. A badly recorded clip is still a badly recorded clip, though.
→Music and sound effects :
There is a built-in library, so you don’t have to hop between five different websites. If you are posting on YouTube or want to make money from the video, check the license on the track first.
→Green screen:
Just record yourself standing in front of a plain green or blue background, drop it into the app, and filter the color right out. After that, you can slap literally any background you want behind you. It’s the classic trick a ton of YouTubers use for their talking-head videos.
Additional Features of Capcut PC
More effects and transitions.
The free app has plenty, but Pro unlocks a lot more. Your edits stop looking like everyone else is.
Sharper exports.
You can save your video in higher quality, even 4K. It looks much better on a laptop or TV.
AI tools that save time.
Auto captions are the big one for me. Writing subtitles by hand takes ages, but here the app listens and builds them in a minute or two. The background remover and skin smoothing are nice extras too.
Extra music and stock clips.
No more jumping between five websites to find a good sound or a short clip. Most of it is already sitting inside the app, ready to use.
Better fonts and text styles.
Good captions can make a simple video look professional. Pro gives you more styles to pick from.
Fewer locked features.
Nothing stops you halfway through an edit with a paywall, and that was honestly the most irritating thing about the free version.
Is Capcut for PC Free or Paid?
The Honest answer is both. You can download CapCut on your computer and start editing for free. There is no need to pay anything or enter your card details. The free plan already covers the things most people need. You can trim your clips, add a song, write text over the video, and play around with a good number of filters and effects. If you only make simple videos, you may never need anything more.
CapCut Pro is the paid side of the app. The paid version works on a monthly or yearly subscription. It gives you access to extra effects, more fonts, a bigger music and stock library, along with some advanced AI features. You do not have to guess what is locked, because those features have a small crown or Pro mark next to them. If you see it, you know it needs a paid plan.
My advice is to start with the free version and see how far it takes you. If you find yourself running into locked features again and again, then Pro may be worth the money. If not, just keep your money.
Capcut pc Vs Capcut Mobile
Who Should Use Capcut for PC?
For YouTubers / Vloggers:
Man, editing long videos on a tiny mobile screen is just pain. Lining up voiceovers and random clips with your thumbs gets old really fast. Once you throw it up on a big computer monitor, it actually feels fun to edit again.
TikTok & Reels Editors:
Creating short-form videos? Add catchy transitions, fun effects, and trending touches to make your content more engaging and grab viewers attention. But trying to use them while your phone lags out or screams about low storage memory is a nightmare.For anyone who finds Premiere Pro too complicated:
For anyone who finds Premiere Pro too complicated:
If Premiere is timeline feels confusing or overwhelming, Capcut offers a simpler and more beginner-friendly editing experience. It strips away all the clutter and confusing settings, letting you jump right in and get great results without a massive learning curve.
Budget Creators:
You can do quite a lot without spending money, including multi-layer editing, green-screen effects, and keyframes, while keeping your regular videos watermark-free.
Anyone with an overheating phone:
If your phone literally turns into a hot frying pan and freezes up right when you are about to finish rendering, your PC’s hardware will save you.
Capcut Download for PC – Installation Experience
Installing CapCut on a PC is pretty simple. Once you have the setup file, open it and follow the steps that come up. You usually will not have to wait very long before the installation is finished.
Once it finishes installing, open it up and jump straight into your edits. The app will definitely bug you to log in if you want access to cloud storage or online templates. But honestly? Sometimes the setup file might fail on the first attempt. If it crashes, check your available disk space or look out for a false Windows security block. Restarting your PC and running it again usually fixes the issue. Usually, doing a quick system restart and launching the setup again does the trick.
Capcut for PC Download on Windows 10 & 11:
“Whether you are on Windows 10 or 11, you’re good to go. It does not need an absolute powerhouse of a PC to run properly. Just try to keep your Windows and graphics card updates somewhat fresh so your playback stays smooth and stutter-free.”
If you are already on Windows 11, great—it handles graphics a bit better. But do not go out of your way to upgrade just for this app; Windows 10 handles casual editing just as well.
Running into weird lag spikes while editing? Close out of your 50 open Chrome tabs and background apps first, because that drains your RAM fast.
If you are just cutting standard clips, you don’t need some insane gaming monster. But if you are trying to render heavy 4K footage loaded with wild effects and transitions, yeah, a stronger PC is gonna save you a lot of freezing and headaches.
Capcut for PC system requirements.
For Windows Users:
Honestly, you do not need a crazy NASA computer to run this. If you are on Windows 10 or 11 (64-bit, obviously), you are mostly fine. Just make sure you are not trying to run it on an ancient machine from 2010.
RAM (Memory):
You have at least 8 GB of RAM if you are just doing basic Edits. But real talk? As long as you are running a 64-bit version of Windows 10 or 11, you are pretty much good to go. Just do not expect it to run smoothly on some dusty machine from 2010
Graphics Card (GPU):
You are going to want a dedicated graphics card—something like an NVIDIA GTX 900 series or a decent AMD equivalent. If you’re relying purely on weak integrated graphics, rendering a video is gonna test your patience big time.
Storage Space:
Check your hard drive before downloading, because if you are running out of space, you are gonna have a bad time. You need a few gigs just to get the app installed, plus a ton of extra room for your actual video files and cache. Seriously, try to use an SSD unless you love sitting around watching progress bars crawl.
How to Download Capcut on PC – Step-by-Step Guide
Step 1:Open your browser and go to the official site :
Open up whatever browser you usually use—Chrome, Firefox, Edge, does not matter—and just go straight to the official CapCut site.
Step 2:Click the download button:
Scroll around until you see the big download button built for Windows, then click it. This will start downloading the setup file directly to your computer.
Step 3: Hang tight for a second:
Just let the file finish downloading. How long it takes basically depends on whether your internet is having a good day or acting slow.
Step 4: Launch the setup file:
Once the download is complete, open the file you just downloaded to begin the installation. If Windows throws up one of those annoying security warning pop-ups, do not sweat it—just hit “Run” or “Yes” to keep moving. (Most of the time you do not even need to mess with running it as an admin).
Step 5: Agree and install:
Check the box to agree to their terms, click the main install button, and let the app do its thing for a few seconds.
Step 6: Launch and start editing:
Once the progress bar hits 100%, hit “Start Now”. The app will open up, and you are totally ready to drop your first video in and start cutting!
Capcut for PC: Pros and Cons
I will be straight with you. CapCut is a good editor, but it is not perfect. Here is what I like and what annoys me.

What is good :
Easy to learn: You can open it and start cutting clips on day one. You honestly do not need some long tutorial just to figure out where the split button is.
Big Screen: Having a big computer screen and a proper timeline makes a massive difference—editing with a mouse just feels way better than squinting and poking at a phone
Free Vision : The free version gives you plenty to work with without needing to pay a dime. Trimming, music, text and basic effects all work without paying.
Auto captions save time: Subtitles are the boring part of editing, and this takes most of that work away.
Lots of trending effects: Transitions and filters that people use on Reels and TikTok are right there.
What is not so good :
Weak PC, weak experience: If your computer is old or has low RAM, the preview will stutter and exports will take a long time.
Some features are Pro only: You can see a lot of effects and fonts for free, but the ones with a small crown need a paid plan, and sometimes you only find out when you try to export.
Some features need the internet: Cloud storage and a few templates and AI tools will not work properly offline.
It changes often: Capcut updates a lot, so a button you learned last month may be somewhere else now
Beginner Tips and Keyboard Shortcuts for Capcut PC
When I started, I did everything with the mouse and it was slow. Learning four or five shortcuts changed that. Here the Short Cuts Given Below :
Split a clip:( Ctrl + B)
Just park your timeline marker right where you want to chop your video, click the clip, and smash( Ctrl + B). Trust me, you will be using this shortcut more than literally anything else.
Delete the extra part:( Delete)
Split the clip, click the part you don’t want, and hit Delete. That’s most of the editing right there.
Undo:( Ctrl + Z)
You will click the wrong thing sooner or later. This brings it back. Need to go back further? Just keep pressing it.
Working on a Mac?
Just swap Ctrl for the Command key on all these shortcuts. Also, make sure you actually click on your clip or timeline first, otherwise your keyboard shortcuts won’t do anything.
Save often.
Do not trust any editor too much, especially on a weak PC. Knock out the boring cleanup work first. Chop out all your mistakes and dead air before you even touch music or effects . Oh, and don’t go wild with transitions either—stick to just a couple of clean ones instead of throwing in ten different effects.
Is There a Capcut for Mac?
CapCut works great on Mac too, not just Windows. Whether you are using an older Intel Mac or one of the newer Apple Silicon chips, the app runs really smoothly. You get all the same features—like keyframes, green screen tools, and effects—without having to shell out cash for expensive programs like Premiere. You can just grab it right from their website or the App Store and start editing.
How to Get Capcut Pro Plan on PC
CapCut Pro is the paid tier, and while you definitely don’t need it when you are just starting out, it unlocks a bunch of extra effects, assets, and AI tools. If you decide to upgrade, here is how you actually do it:
Fire up the app: Open CapCut on your computer and make sure you are logged into your account.
Find the upgrade button: Look for a “Pro” tag or a little crown icon near your profile.The button moves around a bit depending on updates, but you will not have any trouble finding it
Select your payment plan: Pick monthly or annual—more on which one to choose in just a sec.
Wrap up the purchase: Type in your payment info, take one quick look at the total to make sure it is right, and you are officially done
Give it a restart: Do not panic if you don’t see your Pro features instantly; it can take a second. Just quit out of CapCut and open it again to refresh everything.
Monthly or yearly billing?
Month-to-month gives you total freedom—great if you only need Pro for a quick project. If you are going to be editing every week, though, the yearly plan saves you a decent chunk of change in the long run.
My advice? Start with a single month. If you are still using the Pro tools consistently after two or three months, then switch over to the yearly plan to save some cash. I left actual prices out here since they change depending on your region and current promos, so just look at whatever is showing right inside your app.
“Seriously, do not try to find shortcuts here. Only buy Pro from the official CapCut site or app. Ignore those cheap ‘Pro accounts’ floating around online, and definitely do not download any cracked versions. They die out in a week, will get your account flagged or banned, and honestly aren’t worth the malware risk.
Final Thoughts
“Honestly, editing videos on a desktop Capcut is night and day compared to working on your phone. No more overheating screens or random crashes! You get a solid free plan for all your basic cuts and auto-captions, and you can completely ignore Pro unless you want some extra fancy effects later. Just chop out your mistakes first, zoom in when you need to be precise, and use Ctrl + B to save yourself a ton of time.”